The original marine toilet was bolted down on a small platform so that you sat with your back towards the hull. It has been out of the compartment for a couple of years now. When I got the boat it was already disconnected from the sea-cocks so I refurbished them but did nothing with the toilet itself apart from clearing it out of the way to work on bilge pump plumbing and surface coatings. I cannot even reliably identify the make of toilet let alone obtain any appropriate sets of spares so replacement has always seemed to be a better option than servicing the valve and pump. The toilet has now spent about 2 years rolling around in the V berth cabin with the occasional trip elsewhere as I worked on cabin lining, anchor chain and bilge pumps. As I currently have the mast stowed above the cabin top it is going to have to stay there a little longer because it wont fit past the mast through either hatch. Actually taking it off the boat will be one of those “last thing before launch” tidy up tasks once the mast is up properly.
My first ideas were to do a like for like replacement with a marine toilet and connect that to the two sea-cocks with an anti-siphon device mounted on the hull.  I bought the anti siphon loop and plenty of ordinary reinforced hose to plumb the flush water intake. I now suspect that Rathenice will be spending a lot of time based in an estuary or in small harbors and these days it is not appropriate to be discharging overboard unless you are properly off-shore. The first alternative option was to have a black water tank in the forward cabin locker so I bought an apparently suitable holding tank. The tank wouldnt fit into the v berth locker through the available access holes so I was going to be losing almost all the internal storage space in the main cabin. So now we are on plan C with a portable cassette toilet bought and waiting to be installed.
There was originally a perspex wash basin that was emptied by tipping it up into it’s storage compartment. That was connected to a hose which seems to have been pointed into the toilet.  The basin was was screwed to the bulkhead between the entrance and the hull. Beautifully compact but both parts of this would have needed gluing back together and a lot of cleaning and re-polishing. Possibly not all that robust either given that it is likely 1973 or earlier manufacture.
  Also the change to a cassette toilet makes it rather inappropriate to empty the hand washing facility into it. As I have two spare sea-cocks, waste from any basin can be plumbed direct to one of those but I think there is too little space to have even the smallest of permanently installed basins.
2/8/22 On the internet I found two similar tip up basins intended for camper vans or small caravans. I have ordered the smaller one and it arrived today. It is intended to be mounted into a cavity wall with the water and waste plumbing also inside the wall. There will be some work to make it fit on a plywood bulkhead and connect up the waste. There is some potential for modification and decisions as to which item goes where in the compact space available.

5/8/22 On an evening trip to the boat I did a little juggling with the washbasin and measured a few of the distances that might dictate where things can fit. It is not exactly a plan but is enough to get started on working out where things can and cannot go. Part of the fun of restoring an old boat is the mixture of measurements – The boat was designed and built in imperial measurements so things like the plinth are likely to be exact inch measurements however anything modern which is being added is likely to be a more exact metric size.
Tonight I am very glad that the boat is stored where it is as there is a massive fire burning at a waste tyre depot close to the other local storage site. Massive column of black smoke extending over 5 miles down wind from what the news says is at least 1000 tyres. Lets hope the fire brigade (Double figure fire engines from several surrounding counties) can keep it from spreading too much.
6/8/22 Made the adapter out of pine stripwood and a piece of marine ply left over from the cockpit hatches. This is the same size and shape as the original plinth for the marine toilet and is a tight fit onto the four studs that project out of the fiberglass so may not need bolting down. Ideally it would be large enough to mount the toilet on but I only had a narrow  piece of plywood. As with most boat parts it is a strange shape and a challenge to make accurately so was assembled in situ and had several adjustments during the build before taking it apart and gluing at home.
7/8/22 Added more plywood on the inboard edge of the adapter so I can make it just wide enough to fit the toilet hold-down kit.  This bit is semi-load bearing so will need bracing to the compartment floor but it will do for now as I experiment with the wash basin position.
8/8/22 Quick trip to the boat to check out the adapter fit, add the toilet to it and have a little bit of experimenting to see whether the washbasin is at all practical with the layout. As the mast is currently on top of the cabin I had to remove one of the spreaders before I could get either half of the toilet in through the hatch but it all seems to fit into the compartment in a cramped but functional way.
One thing is absolutely certain, the basin cannot go on the bulkhead as it would be too wide to allow the curtain-fold door to open.

However there is enough space to fit it under the side deck behind the toilet and the water level in the basin will be above the outside sea level unless there is a lot of heeling going on – A slight risk but should be OK if the sea cocks remain closed except for when the basin is actively being emptied.
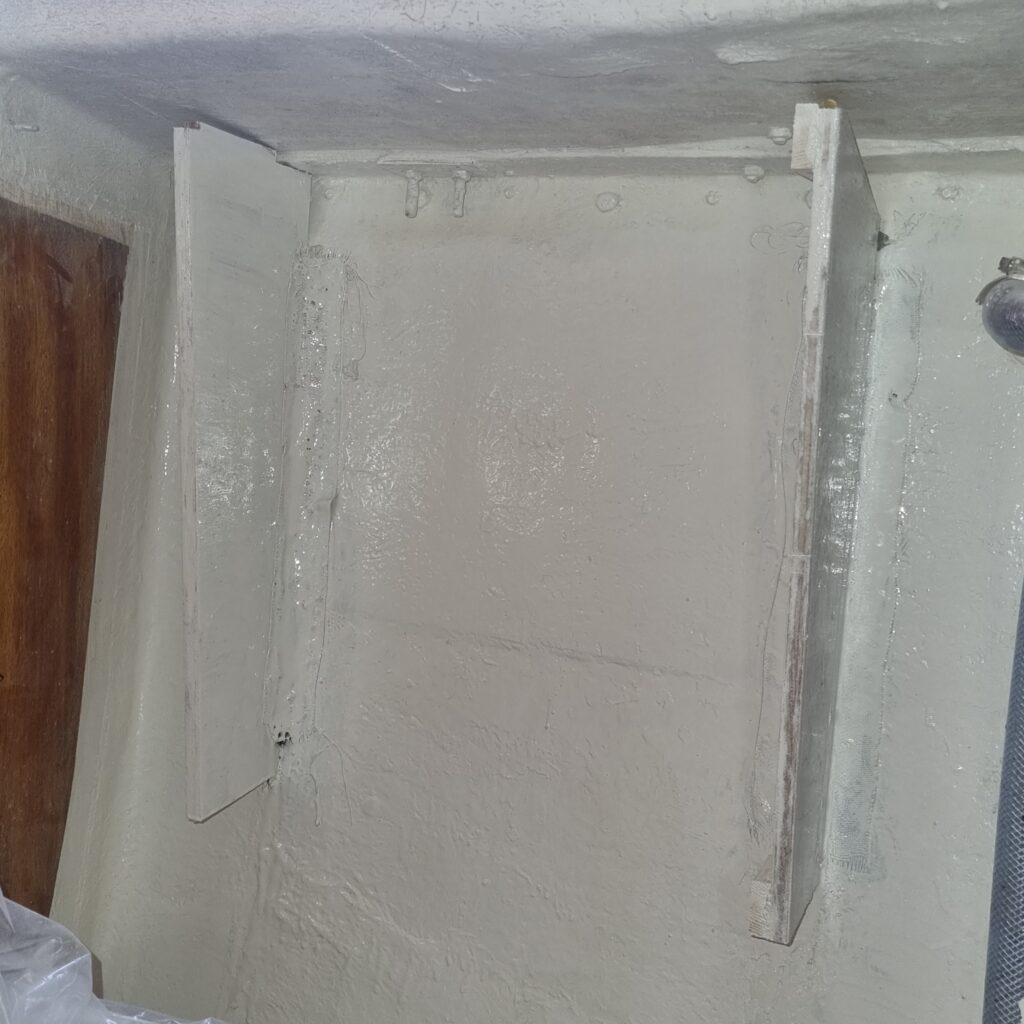
14/8/2022 I am sure that any practicing boat builders reading this will be familiar with the concept of a tick board to measure out complex curves –  Basically I made a piece of MDF board that touched the inside of the hull at top and bottom of the required panel, then used a short length of batten to mark on the direction and distance to key points in the curve. In this case the gaps were all quite small so I used a standard distance marked on the batten and the whole shape was then “measured” by repeatedly drawing along the edge and marking the position of the standard length. You then reverse the process to locate the critical positions and join the dots to draw out the curve onto the plywood stock.
Today’s progress is to sand off the paint where the panel needs to be attached, roughen up the fiberglass hull a little and then do a semi-permanent attachment job with gorilla glue. Getting the panel vertical and reasonably close to perpendicular to the eventual basin was definitely a challenge. The attachment is a bit of a random lash up but, at least in theory, the tape will hold the plywood in the correct position until the glue sets. As with the navigation table mounting, the gap filling ability of the glue is an advantage but slow setting means I have to be very patient. It also ideally fits with the 2 hour slots of free time that I can sometimes build into my evenings as I can do the two journeys between home and storage and around 45 minutes actual work in a weekday evening when I am not doing the late duty biochemist shift from home.
15/8/2022 Step 2 of the attachment process is to remove excess glue and add a fillet of car filler along the inner edge of the plywood panel. Once this has set I will be able to add one or more layers of woven fiberglass tape to properly and rigidly attach the panel. At the same time I added the wooden blocks which will eventually receive the mounting screws.
17/8/22 Same process started with the second panel – This one needs to be close to parallel to the first and the right distance away to allow the mounting screws to hit wooden blocks top and bottom. More tape but the whole thing is just about starting to look like a box into which one might eventually attach a wash basin.
That will be the last bit of progress for a while as we will be on 2 weeks holiday in Dorset. Boat stuff will be limited to a little admiring of other people’s boats and inflatable kayak trips with the 7 and 11 year old children from the Ukrainian family who we are hosting. Filler fillets on this panel and fiberglass tape reinforcing will have to wait until September when they are both back at school.
7/9/22 The Ukrainian family have now moved into their own 3 bedroom house just up the road so, untill the grandparents arrive in October, I can go back to working on the boat some evenings. A quick trip tonight to remove all the gaffer tape, add a filler bead to the stern side of the basin mounting and do a dry fit of the basin system itself. 
It is a firm fit without mounting screws but seems to be in a usable position relative to the toilet – Cannot go much higher because of the side deck.

8/9/22 RIP Queen Elizabeth II
Picked up another order of fiberglass resin during the day so another brief evening trip to the boat. This time to add a single strip of fiberglass woven tape on the inside edge of each of the mounting pieces. Once the resin has cured I will be able to clean up the visible edges of the plywood and add similar fiberglass strips on the outside to reinforce the assembly.
Saturday 10/9/22 Two more strips of fiberglass tape added today to reinforce the attachment. Tidied up the hull and did a first coat of paint on the plywood and another coat on the hull to cover up what remains of the resin drips and the areas where paint was removed to allow the fiberglass to bond to the hull. There will be at least two more coats even though the plywood is not really all that visible – Rather than being marine grade, the sheet I used is old high quality plywood (thick veneers, no voids that I could detect but it is probably not made with fully waterproof glue) and is in a potentially high humidity area so it needs sealing well.
Friday 16/9/22 Second coat of paint on the brackets this evening. Tomorrow will be D-day with the wash basin screwed onto the mounting. I also painted the top of the toilet adapter with it’s first coat of paint. There will be a few more coats to add to that as it needs to be well sealed all around. There is quite a lot of potential for it getting splashed and also for water to get underneath undetected and sit in contact with the battens.
Sunday 18/9/22 Well yesterday vanished in a flurry of weekly shop, ferrying my wife to various things and eventually an evening with the Ukrainians at their house. No boat stuff got done among that. Sunday afternoon proved productive though with another coat of paint on both sides of the toilet adapter and the wash basin getting permanently mounted. Still needs a few minutes work to plumb the drainage and then a major tidy up before properly installing the toilet.
13/10/22 After pause in boat work to sort out Ukraininan families moving into their own rented houses, collection of the sisters’ parents and then a bout of illness and self-isolation with the dreaded virus, I finally managed to do the basin plumbing today and put back all the painted parts of the toilet adapter. As the interior is just about livable there are not many excuses left for not launching now.
First published 9/8/2022 with subsequent updates as progress is made.